
Today one of my customers who bought ready online store required a little modification site, namely, emu it was required to add to the item option with the type of radio image.
I think you already know that in the options of the online store on the basis of opencart to each value there is an opportunity to add a picture, but it is displayed only with the type of option ("Image"). Today, we'll look at how to make the image display with other types of options, in this case we will display images for the radio option types and checkbox.
As in most cases, in order to perform this task you need to change the code of the online store a little, in this case you need to make changes only to one single file of your template, namely to the file that is responsible for the product card /catalog/view/theme/default/template/product/product.tpl.
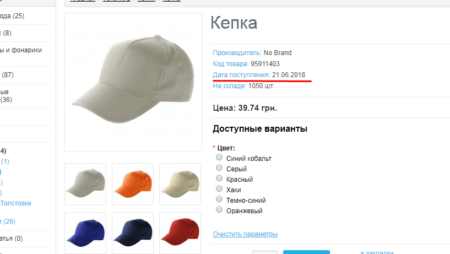
As everything looks like you can see in the photo below, click to enlarge.


The general we proceed, we will deduce a picture of value of an option for the above types of options. First of all, we add the picture to the type of the radio option, to do this, open the above file and look for a piece of code in it that is responsible for the output of this type of option, namely we need to find two lines:
|
1 2 |
<?php foreach ($option['option_value'] as $option_value) { ?> <input type="radio" name="option[<?php echo $option['product_option_id']; ?>]" value="<?php echo $option_value['product_option_value_id']; ?>" id="option-value-<?php echo $option_value['product_option_value_id']; ?>" /> |
And between these two lines we add the following code which will display the picture of the option:
|
1 2 3 |
<label for="option-value-<?php echo $option_value['product_option_value_id']; ?>"> <img align="middle" class="options-popups" src="<?php echo $option_value['image']; ?>" alt="<?php echo $option_value['name']; ?>" /> </label> |
That's all, now the picture will be displayed with the type of option radio. For the checkbox option type, we do everything by analogy, look for the output of the checkbox option, ie, there are two lines:
|
1 2 |
<?php foreach ($option['option_value'] as $option_value) { ?> <input type="checkbox" name="option[<?php echo $option['product_option_id']; ?>][]" value="<?php echo $option_value['product_option_value_id']; ?>" id="option-value-<?php echo $option_value['product_option_value_id']; ?>" /> |
and between these lines we add the image output:
|
1 2 3 |
<label for="option-value-<?php echo $option_value['product_option_value_id']; ?>"> <img align="middle" class="options-popups" src="<?php echo $option_value['image']; ?>" alt="<?php echo $option_value['name']; ?>" /> </label> |
More and more you do not need to do anything, well, except that you can process all this with beautiful CSS styles so that everything looks beautiful and displayed.
And do not forget to add this image to the admin panel in the options values ![]() .
.
There are still cases when there is a desire to do so that when clicking on the image option the photo increases in the pop-up window as for example the picture of the product increases with the click, let's consider this option and make the increase of the picture option when clicking on it.
In order to make the pop-up window of the picture option in full size you need in the same product.tpl file instead of the code:
|
1 2 3 |
<label for="option-value-<?php echo $option_value['product_option_value_id']; ?>"> <img align="middle" class="options-popups" src="<?php echo $option_value['image']; ?>" alt="<?php echo $option_value['name']; ?>" /> </label> |
add another code namely:
|
1 2 3 4 5 |
<label for="option-value-<?php echo $option_value['product_option_value_id']; ?>"> <a href="<?php echo $option_value['options_popups']; ?>" title="<?php echo $option_value['name']; ?>" class="colorbox" rel="colorbox"> <img align="middle" class="options-popups" src="<?php echo $option_value['image']; ?>" alt="<?php echo $option_value['name']; ?>" /> </a> </label> |
And you also need to make changes to the controller file /catalog/controller/product/product.php, in it we find the line:
|
1 |
'product_option_value_id' => $option_value['product_option_value_id'], |
and after it we add the following code:
|
1 |
'options_popups' => $this->model_tool_image->resize($option_value['image'], $this->config->get('config_image_popup_width'), $this->config->get('config_image_popup_height')), |
That's all. I would be happy if the article will be useful to someone. Good luck to you.


No Comment
You can post first response comment.