Kind time of day dear visitor of our site. Today I want to share with you a wonderful stylish 3D menu for your site that is created on pure CSS without the use of JS code.
At development of sites there is often a question how to create a menu for the site, because correct, convenient and beautiful navigation is one of the most important elements of any web resource.
Web masters often do not pay much attention to the creation of the menu, which is not entirely true in my opinion. Each site should be unique and it should have its own zest, so why not show your imagination and do something unusual and attractive.
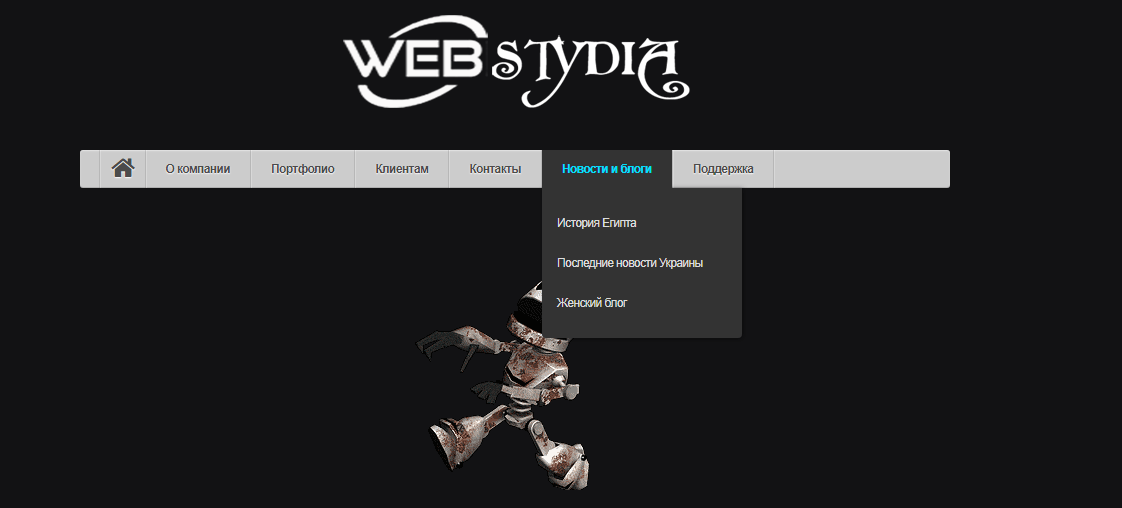
And so, as already mentioned above, in today's article we will create a horizontal menu with stylish 3D effects when hovering, as everything will look like you can see in the demo example that we will add at the bottom of the page.
We will start creating a menu for the site:
First of all we need to create HTML markup for our menu:
|
1 2 3 4 5 6 7 8 9 10 11 12 13 14 15 16 17 18 19 20 21 22 23 24 25 26 27 28 29 30 31 32 33 34 35 36 37 38 39 40 41 42 43 |
<div id="container"> <ul id="menu"> <li><a href="#">About company</a> <ul> <li><a href="#">Contacts</a></li> <li><a href="#">Materials</a></li> <li><a href="#">Presentations</a></li> </ul> </li> <li><a href="#">Portfolio</a> <ul> <li><a href="#">Interesting work</a></li> <li><a href="#">Successful work of the photographer</a></li> <li><a href="#">Orders</a></li> <li><a href="#">Studio</a></li> <li><a href="#">To see my work</a></li> <li><a href="#">Order a photo session</a></li> </ul> </li> <li><a href="#">For Clients</a> <ul> <li><a href="#">Order studio</a></li> <li><a href="#">Rent of equipment</a></li> <li><a href="#">Discount system</a></li> </ul> </li> <li><a href="#">Contacts</a> <ul> <li><a href="#">Where are we</a></li> <li><a href="#">Our office</a></li> <li><a href="#">How to find us</a></li> </ul> </li> <li><a href="#">News and blogs</a> <ul> <li><a href="#">History of Egypt</a></li> <li><a href="#">Latest news from Ukraine</a></li> <li><a href="#">Women's Blog</a></li> </ul> </li> <li><a href="#">Support</a></li> </ul> </div> |
As you can see in the HTML markup of the menu there is nothing ordinary, the standard table li list, so I think it's easy to understand, you can easily add or modify new sub-paragraphs.
Next will be css code for the created menu, in this lesson this is just the most basic. In this css code we'll add a transformation with which menu subitems will fall out, add some standard base styles, and apply the rotateX function with which we define the rotation angle, and we'll add a gradient fill with which we'll create smooth transitions and shadows.
And so below the code itself css:
|
1 2 3 4 5 6 7 8 9 10 11 12 13 14 15 16 17 18 19 20 21 22 23 24 25 26 27 28 29 30 31 32 33 34 35 36 37 38 39 40 41 42 43 44 45 46 47 48 49 50 51 52 53 54 55 56 57 58 59 60 61 62 63 64 65 66 67 68 69 70 71 72 73 74 75 76 77 78 79 80 81 82 83 84 85 86 87 88 89 90 91 92 93 94 95 96 97 98 99 100 101 102 103 104 105 106 107 108 109 110 111 112 113 114 115 116 117 |
#menu { position: relative; float: left; width: 100%; padding: 0 20px; border-radius: 3px; box-shadow: inset 0 1px 1px rgba(255,255,255,.5), inset 0 -1px 0 rgba(0,0,0,.15), 0 1px 3px rgba(0,0,0,.15); background: #ccc; } #menu, #menu ul { list-style: none; } #menu > li { float: left; position: relative; border-right: 1px solid rgba(0,0,0,.1); box-shadow: 1px 0 0 rgba(255,255,255,.25); perspective: 1000px; } #menu > li:first-child { border-left: 1px solid rgba(255,255,255,.25); box-shadow: -1px 0 0 rgba(0,0,0,.1), 1px 0 0 rgba(255,255,255,.25); } #menu a { display: block; position: relative; z-index: 10; padding: 13px 20px 13px 20px; text-decoration: none; color: rgba(75,75,75,1); line-height: 1; font-weight: 600; font-size: 12px; letter-spacing: -.05em; background: transparent; text-shadow: 0 1px 1px rgba(255,255,255,.9); transition: all .25s ease-in-out; } #menu > li:hover > a { background: #333; color: rgba(0,223,252,1); text-shadow: none; } #menu li ul { position: absolute; left: 0; z-index: 1; width: 200px; padding: 0; opacity: 0; visibility: hidden; border-bottom-left-radius: 4px; border-bottom-right-radius: 4px; background: transparent; overflow: hidden; transform-origin: 50% 0%; } #menu li:hover ul { padding: 15px 0; background: #333; opacity: 1; visibility: visible; box-shadow: 1px 1px 7px rgba(0,0,0,.5); animation-name: swingdown; animation-duration: 1s; animation-timing-function: ease; } @keyframes swingdown { 0% { opacity: .99999; transform: rotateX(90deg); } 30% { transform: rotateX(-20deg) rotateY(5deg); animation-timing-function: ease-in-out; } 65% { transform: rotateX(20deg) rotateY(-3deg); animation-timing-function: ease-in-out; } 100% { transform: rotateX(0); animation-timing-function: ease-in-out; } } #menu li li a { padding-left: 15px; font-weight: 400; color: #ddd; text-shadow: none; border-top: dotted 1px transparent; border-bottom: dotted 1px transparent; transition: all .15s linear; } #menu li li a:hover { color: rgba(0,223,252,1); border-top: dotted 1px rgba(255,255,255,.15); border-bottom: dotted 1px rgba(255,255,255,.15); background: rgba(0,223,252,.02); } |
That's all that was needed to create a beautiful menu for your site. Use on health!
You can see a live example on our website:


No Comment
You can post first response comment.